|
For many a trip to the stunning slot canyons at Page, Arizona will be a once in a lifetime opportunity (and it probably will be for me unless I can convince the family we should return), and as such it makes sense to make the most of your visit. I hope my experience from my trip in the summer of 2015 proves helpful to sum. The first challenge is finding the tour company you want to use and selecting a specific tour. You have to visit the canyons through a tour guide. I used Adventurous Antelope Canyon Photo Tours (web page www.navajoantelopecanyon.com), partially as they responded to emails and I was confident I actually had a booking, but also they offer a number of tours, and whilst I love my family dearly, they don’t always mix well with photography. So I booked Tour 2, Upper Antelope and Rattlesnake starting at 9:30 and my family on Tour 10 – just Antelope Canyon starting at 10:15. This meant I managed to do as much photography as possibly whilst minimising the time for the family to wait around for me. Wal Mart is easy to find in the local town of Page to keep them happy. It’s best to be in Antelope canyon around midday on a bright sunny day if light shafts are your goal. I recommend choosing a photographic tour, this allows you to take your tripod and the tour groups are very well organised and move the masses out of the way to enable you to get the classic shots. Your photographs will be severely limited if you don’t go this route, a tripod for most will be essential with exposure times down to a few seconds. The photographic tour of Rattlesnake and Upper Antelope cost $138 in 2015, not cheap but we had a good guide (Roman – sorry if misspelt) and 3 photographers, for a total 3.5hrs, which I which was good value. What equipment to take is a key question, you want to travel light and you want to avoid changing lenses in the canyon. In the end I took the Canon 5D mk2 with 24-105mm lens and the Fujifilm X-Pro with 18mm lens as a back-up. I didn’t use the Fuji and felt the Canon combo was ideal. Other accessories included a tripod and remote release. Another advantage of Antelope Canyon Tours is they are located outside of Page, pretty close to the canyons, so the day started with a quick drive to the canyons starting with Rattlesnake canyon. Antelope Canyon Tours are the only operator providing tours of this canyon, so one big advantage is we had the canyon to ourselves, this is great opportunity to explore the canyon and get familiar with typical settings needed on the camera, I found F11 was a good starting point with provided good depth of field throughout the picture. Roman was excellent at pointing out common view points whilst allowing us to explore ourselves and still keeping the pace moving to ensure we kept to our schedule. Rattlesnake canyon is great for abstract shots and patterns, the shot below was shot at 28mm F11 1/10s, ISO 100. 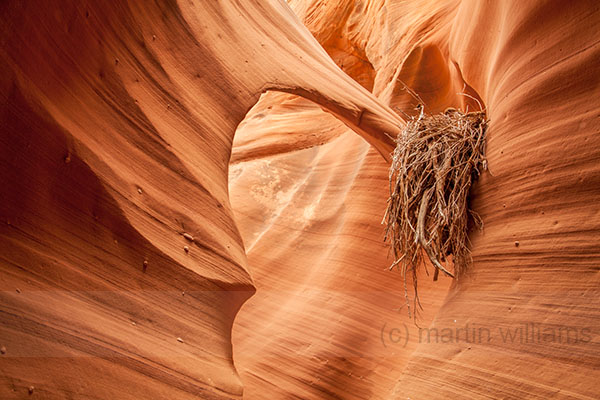 And below 24mm, F11, 1/8s, ISO 100 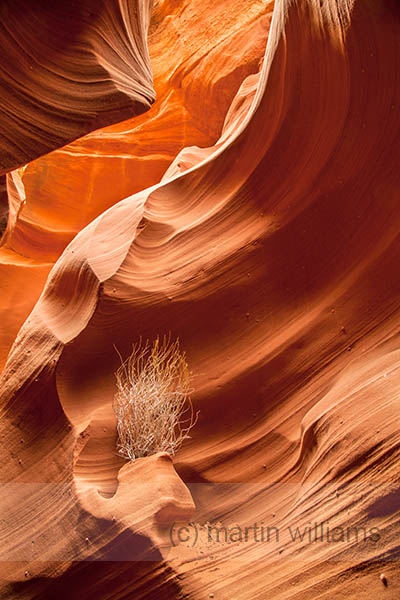 Rattlesnake Canyon is quite narrow and whilst I had taken a camera rucksack into the canyon, it limited movement somewhat and I recommend you leave it behind, especially at Upper Antelope canyon where it will get in the way of other people too. I typically kept ISO at 100 but you could increase this a little as some noise on the sandstone is not as noticeable as noise on a clear blue sky, but it’s best to keep it down to retain details. I also bracketed exposures quite a bit, which means that any burnt out parts might be available still, and provides the option to do HDR, but I did try a few shots as HDR and didn’t feel it added anything. After Rattlesnake it was a quick drive to Upper Antelope canyon, and the big difference is the number of people. In the height of summer the canyon is a solid flow of tourists, so there is little chance of getting full height floor to sky shots until a bit later when a number of the tour guides work together to block the masses from entering certain chambers whilst photographers line up like a firing squad to take the classic shots. Also due to the masses dump any camera bags and leave them in the truck, travel light with camera on tripod. I actually took my Fuji X-Pro1 in but it was in the way, so when I bumped into my wife I generously gave it to her to use. First part of the visit to Antelope Canyon consisted of a tour through the slot canyon with our guide pointing out the common views. I recommend keeping close to the guide as they know the sights and although it’s great to explore the angles yourself it would be easy to miss some great pictures, such as the Monument valley view below. You need to work fast to keep the pace up, bracketing can slow this down, but if you don’t bracket always check the back of the camera after to check for blown out areas and check exposure is good. Always shoot in RAW, it provides greater exposure range and allows you to change white balance later. As it’s crowded it’s necessary to work fast and grab the shots between people moving into the scene. 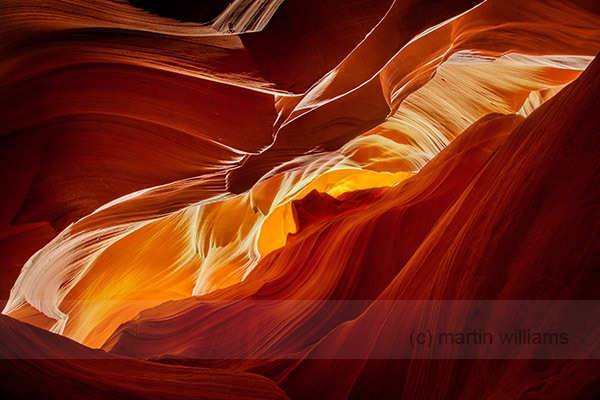 Monument Valley View - 24mm, F11, 2.5s, ISO 100 After reaching the end of the canyon it was approaching midday and time for the photographic tour groups to gather together in the middle in the hope for the light shaft shots. The tour guides we great at organising us, getting the photographers to line up in tow lines, one on the ground and one standing, whilst they posted guides up and downstream to stop unwanted intruders. The light beams are created by throwing sand into the air, I bumped the ISO up a little to capture some texture in the light beams. One tip worth noting is to set the camera to manual for this part, the difference in exposure between the sand being thrown and no sand easily fools the camera. Set exposure below the sand is thrown and underexposure a little as the whole chamber will illuminate when the sand is thrown. Bracketing can help recover some burnt out parts, but stay on the underexposed side otherwise by the time your camera has finished 3 exposures (on the 5d Mk2) you might have missed the sand being thrown a couple of times. 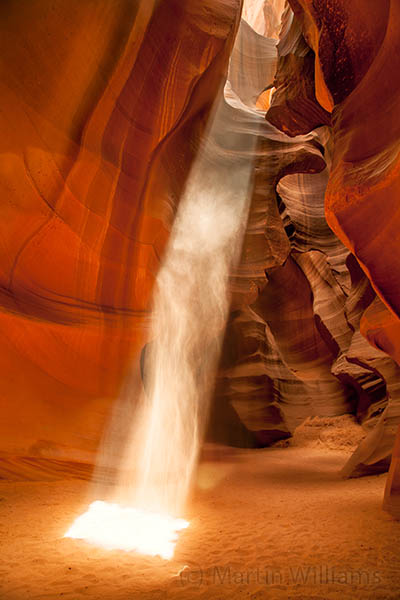 Light Shaft - 24mm, F11, 1/30s, ISO 200 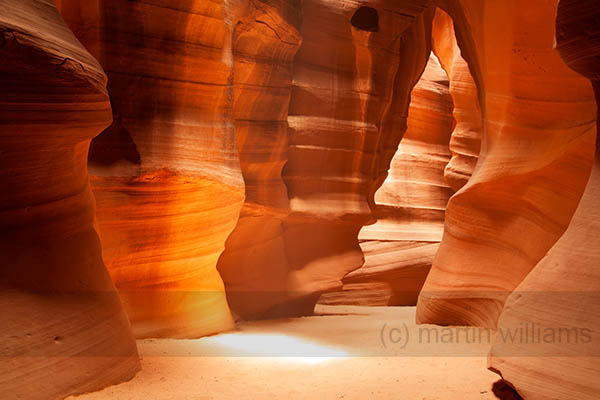 Illuminate - 28mm, F11, 1/3s, ISO 100 As well as taking pictures of the light beams we had the chance to capture sand falling from a rock shelf. Make sure your camera is level and snap away, this was probably the only shot I would have liked to take wider than 24mm. 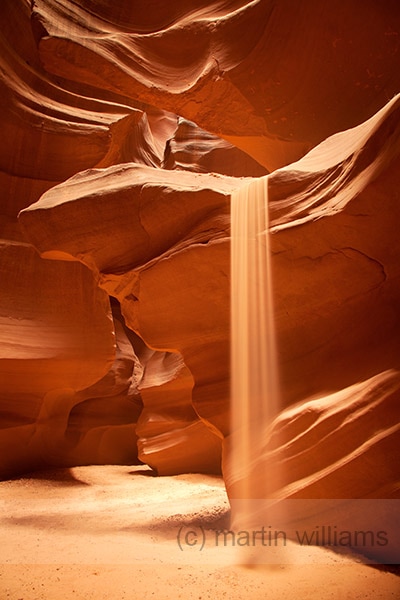 Sand Falls - 24mm, F10, 2.5s, ISO 100 After my trip to the slot canyons my top tips are:
My prints are available from here and here Another top tip is that horseshoe bend is just a short 10 minute trip from Antelope Canyon, this is a breath taking view on a 1000ft drop and stunning river meander. 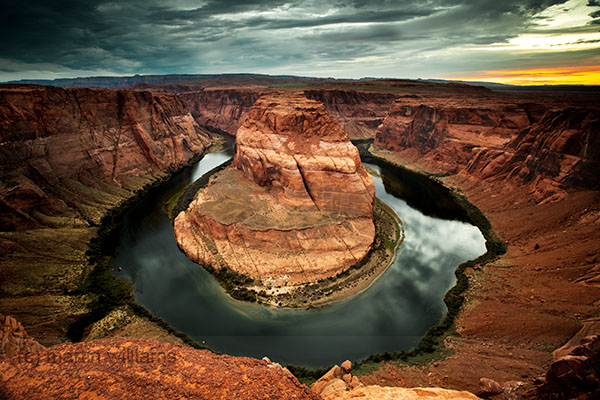
0 Comments
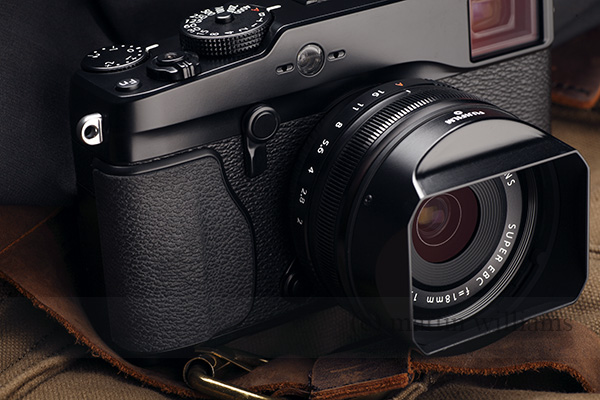 It would appear there has been a party going on for a few years now, and I've totally missed it until very recently. This party is the world of mirrorless camera. I avoid getting wrapped up in the exciting world of new camera technologies, it’s a slippery slope, and easy to end up spending more time obsessing about the latest camera releases than spending time taking pictures with the camera you have, and in my case I was (and remain) very happy with my Canon 5D MK2. My Canon still remains a great camera, does everything I want, but sometimes when you have your bag packed with a few EF lenses, filters and a tripod it can start to get a bit heavy. This seemed to be the case on a recent 2 day trip to London, I walked a significant amount of miles in the two days and felt the strain by the time I got home. This started me thinking whether I should look at a lighter option. It wasn't long before I started looking at mirrorless cameras and started reading reviews on the web. A number of manufacturers seem to get great reviews, but I narrowed the search down to Fujifilm and Olympus. Both manufacturers had cameras that looked and felt right, and after some considerable research my preference went to Fujifilm. The prime reason being low light performance with low noise at high ISO and the X-Pro1 was being offered with two fast lenses for around £650. The Olympus has image stabilization, so even this was a hard choice. I also found a great little website that enabled you to compare camera and lens sizes, www.camerasize.com, check it out ( http://j.mp/1Goi4aX ). 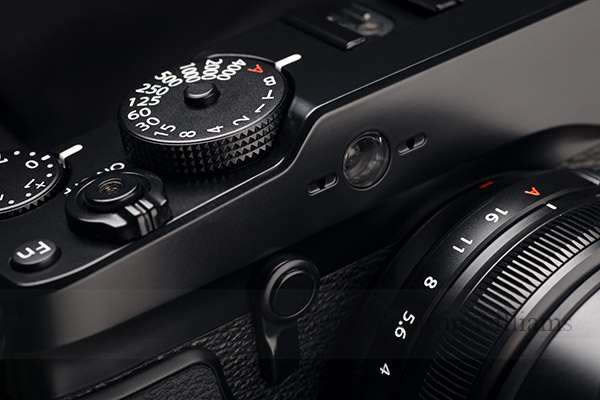 Both cameras looked great, so after getting the X-Pro1 the first thing I did was take a few pictures of it (possibly a bit sad, but I'll take a picture of anything). Soon after getting the Fuji we had a family weekend trip to Edinburgh. I'd already played with the Fuji a bit and was happy to leave the 5D at home. The Fuji performed great, a little frustrating that it will only auto bracket to a max of +/- 1 stop, which makes HDR a little fussy, but it's still possible. When zoomed in to 100% the pictures are superb and sharp with the 18mm lens. Also tried some street photography, but initial results were average. 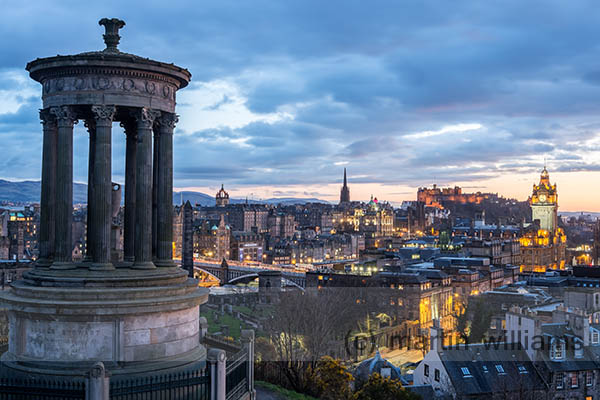 A later trip to a regular haunt of mine at the Shambles in York and once again great night performance, the picture below is tripod mounted at ISO200, but the Fuji preforms incredibly well at high ISO's. So well in fact that for the first time ever I have set my camera to auto ISO with a max set at 1600, it means that I can now happily shot away when the light starts dropping, where I would have normally just put the Canon away. 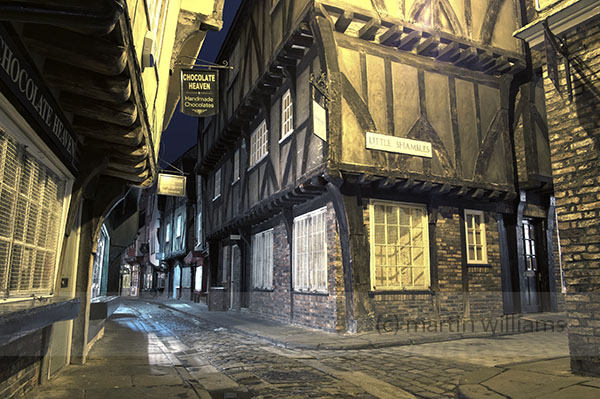 With just two fixed lenses (18 and 27mm) the Fuji probably won't be my normal landscape camera, but I did take it with me on a trip to Saltwick Bay, nr Whitby. Saltwick Bay is a photographers paradise, plan ahead and make sure the tide will be low during sunset or sunrise and you'll have a wonderful rocky landscape to explore, with Black Nab stack to add some interest and even the ship wreck of the Admiral Von Tromp. After the light had dropped and exposures on the 5D with ISO 100 were becoming very long, I thought I'd take a couple of snaps with the XP1. It seemed to excel in the dark, The combination of ISO 200 and a smaller sensor meaning a smaller aperture still kept everything in focus suddenly meant I could get exposures that took less than a few minutes. Suddenly time flew by and the light was so poor it was a struggle to find my way back to the car (must remember my torch next time). An advantage of a small frame camera like the Fuji, compared to the full frame Canon, is the cost of filters! There's no longer any need for expensive 100mm filters to cover the front of a 77mm dia lens, I can now use A size filters. But note even with a hard edge A size filter on the 18mm Fuji lens, it still means the edge is very soft. I bought some SRB filters, so far they seem good. 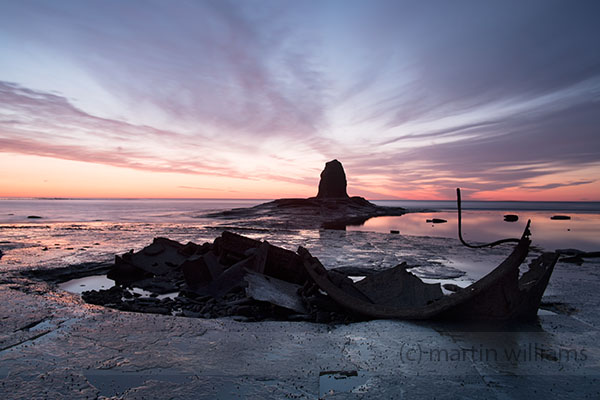 There’s no argument, the X-Pro1 is a bit old in the tooth now, but I didn't need all the fancy features of new cameras, although an articulated screen would have been good. So the question – did I make the right choice? Yes, I think I did. I love the compact size and the Fuji will now be the default for trips with the family. The X-Pro1 with the two lenses is great value, both lenses perform well, are sharp and even focus time is good (I don't do sports or any fast moving photography!). There are a few annoying things, the maximum 1 stop bracketing,, the fact multiple exposure is not on the motor drive menu button (you have to delve deep into the menus) and there is no simple IR remote you can use (you need to use a mechanical cable release), but this camera (and I suspect the whole X-system Fuji series) is superb and offers a great alternative to a big SLR. We are off for a fantastic road trip to California soon, the question is will I just take the XP!?  Keywords - fujifilm, x-pro1, xp1, camera, 18mm, 27mm, deal
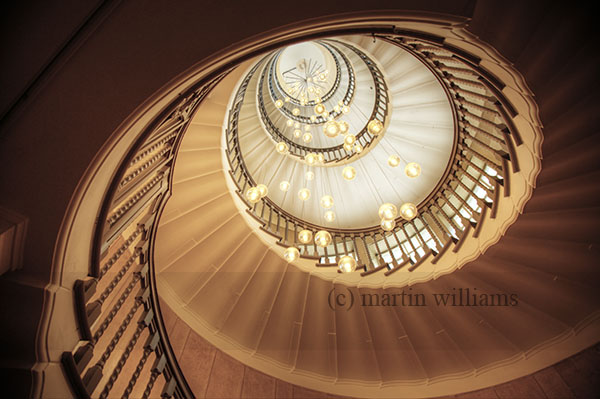 Managed a two day trip down to London, great chance to take some architectural shots. Started at Heals department store for the stunning spiral staircase and lighting, also a look around at the stunning contemporary furniture, very tempted, but already had some heavy camera equipment to carry miles around London. 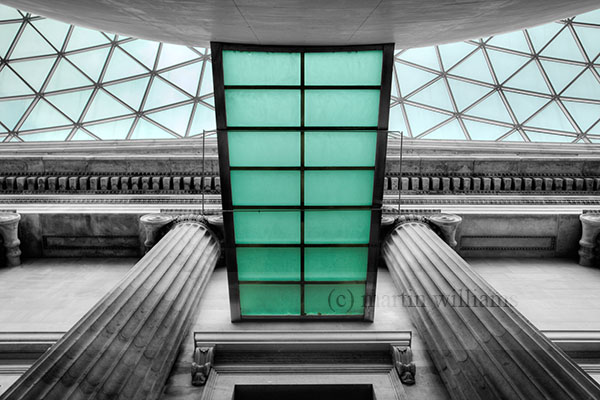 Next stop is my favorite British Museum and the stunning Great Court, plenty of picture opportunities. 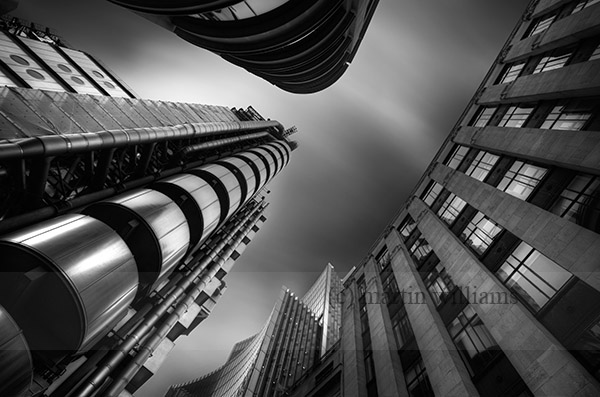 Weather turned a bit cloudy, not great for photography outside but did suit some mono shots. Including Lloyds of London. 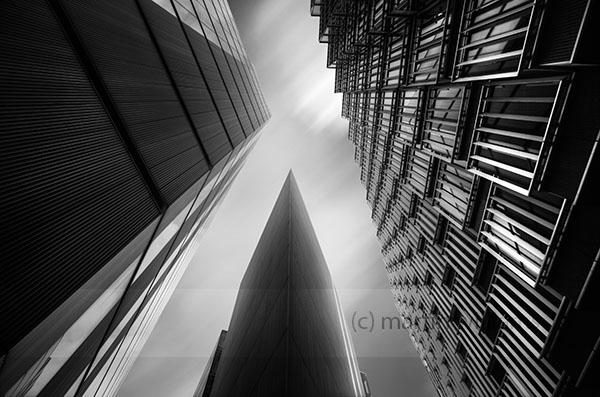 And even managed to take some pictures near to City Hall with security standing next to me without being moved on! Have they relaxed a bit with photographers? I've previously been sent away before by refuse collectors. 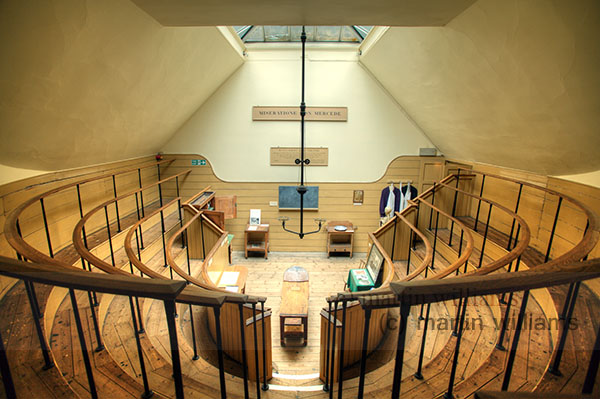 Great little museum, the old operating theater, which is a stones throw from the Sage. Used before 1822 to operate on women with stalls to allow the young student doctors to watch and no anesthetics. Glad we have the NHS now. 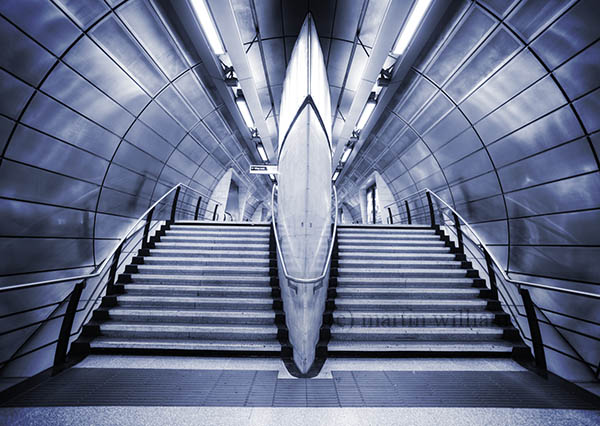 A short tube ride to Southwark station, some great art deco design, very Metropolis. 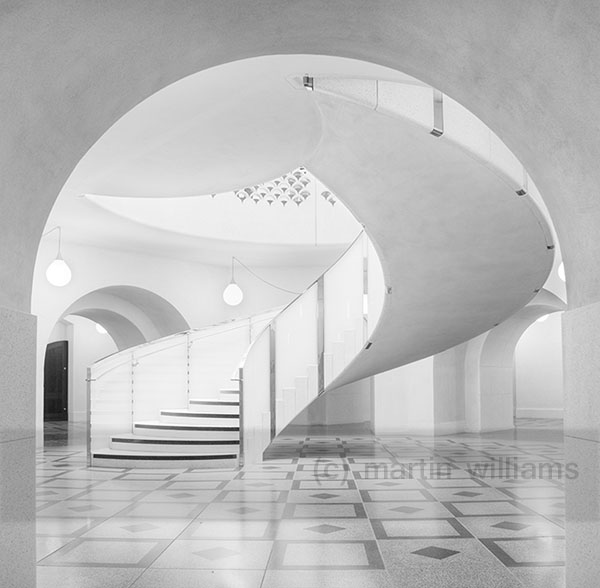 Final place to visit was Tate Britain, which I hadn't visited for a very long time, and now one of my new favorite galleries, architecture is stunning, and a great relaxed atmosphere allowing photographers in the galleries. i recommend a visit.
Overall a great couple of days, possibly not the most original photos of London as these places are well photographed, but very enjoyable. Tags: london, photography, tate, britain, phtot, heals, staircase, mono, what to shoot, canon 5d mkII |
AuthorYorkshire based photographer specializing in landscape and stock. Archives
February 2017
Categories |
 RSS Feed
